 Pin
Pin I'll never forget the December evening when my sister arrived at my door with a photo torn from a ballet program—The Nutcracker—and said, "Let's make something like this for the holiday party." I'd never attempted a tiered charcuterie board before, but something about the idea of recreating the grandeur of that famous ballet on a table top felt magical. We spent hours that afternoon arranging colors like a stage designer, discovering that food could be just as theatrical as any performance. That night, watching guests gasp when they walked in, I realized this board wasn't just about feeding people—it was about creating an edible masterpiece that told a story with every color, every texture, every thoughtful placement.
What I cherish most about this board is the memory of my nephew—who usually refuses anything "fancy"—standing in front of it for ten minutes, studying each section like he was in an actual museum. He started at the red, moved to the green, then gold, then white, creating his own little journey through edible colors. By the end of the party, half the board was gone, but what remained was the image of a kitchen full of laughter and connection, built entirely through arrangement and intention.
Ingredients
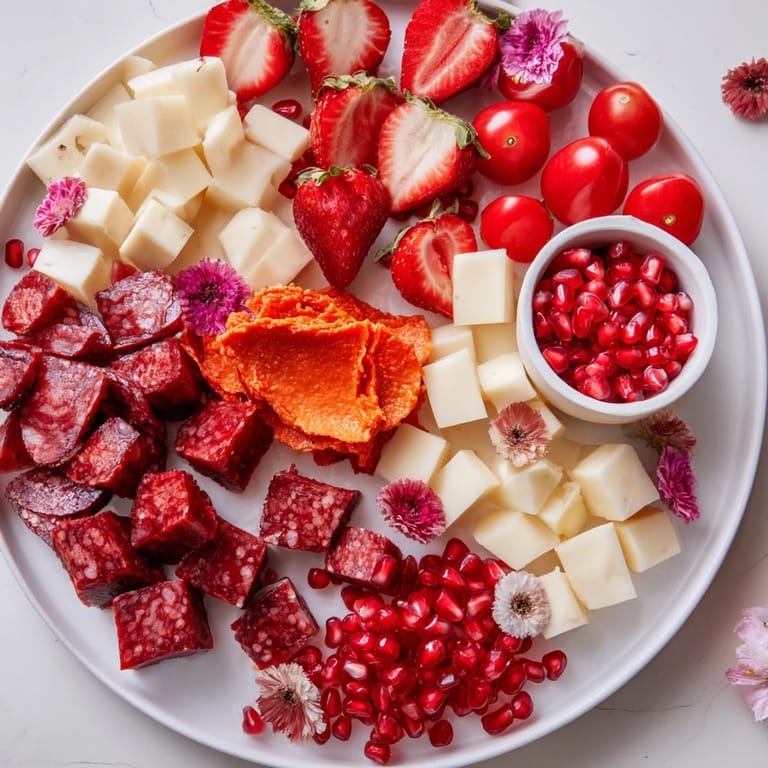
- Red Section — Strawberries, hulled and halved (1 cup): These are your brightest jewels; choose ones that are deeply colored and fragrant. They'll be eaten first by most guests, so prep them just before assembly.
- Red Section — Cherry tomatoes (1 cup): These little orbs add juiciness and visual weight. Slice a few in half to show off their interior color and create visual interest among the berries.
- Red Section — Pomegranate arils (1/2 cup): The ultimate textural surprise—juicy, slightly tart, and undeniably elegant. They're also the most likely to catch the light beautifully.
- Red Section — Red pepper hummus (8 oz): This is your color anchor and flavor anchor. A small decorative bowl becomes the heart of the red quadrant, so choose one that matters visually.
- Red Section — Dried cranberries (1/2 cup): These fill gaps naturally and add a subtle tartness that balances richer elements. Don't skip them just because they seem decorative—they taste as good as they look.
- Red Section — Sliced spicy soppressata (6 oz): The heat here provides contrast to sweet fruits. Arrange them in loose folds rather than flat stacks to catch light and create dimension.
- Red Section — Red wax Gouda, cubed (6 oz): This cheese has a mild, slightly sweet flavor that plays beautifully with the spiced soppressata. Cube it rather than slice it so it sits differently than the cheese in other sections.
- Green Section — Green grapes, halved (1 cup): Halving them seems tedious until you realize it doubles your visual coverage and creates those beautiful little crescents. The exposed flesh also releases subtle sweetness into the air.
- Green Section — Sugar snap peas (1 cup): Keep these whole and arrange them like little green boats. They're one of the few items that stays perfectly fresh and crunchy for hours, so lean on them if you're assembling ahead.
- Green Section — Castelvetrano olives, pitted (1/2 cup): These buttery, mild olives are green-as-green can be and taste completely different from black varieties. They're the secret weapon that makes people taste one and say, "Wait, what is this?"
- Green Section — Pesto dip (8 oz): Use a bright, fresh pesto if possible. This is your second anchor point, so its vibrancy matters as much as its flavor.
- Green Section — Roasted pistachios, shelled (1/2 cup): The natural pale green of the nut plays beautifully with darker greens. Toast them lightly yourself if you have time—store-bought is fine, but fresh-roasted changes everything.
- Green Section — Sliced cucumber (6 oz): Paper-thin slices arranged in overlapping rows create architecture and reflective surfaces that catch light. A vegetable peeler makes these translucent and elegant.
- Green Section — Herbed goat cheese, sliced into coins (6 oz): The creamy white against the bright greens is essential contrast. Chill these thoroughly before slicing so they hold their shape.
- Gold/Yellow Section — Golden cherry tomatoes (1 cup): Yes, they're technically a repeat, but the color shift from red is dramatic and necessary. They taste slightly sweeter than red varieties.
- Gold/Yellow Section — Fresh pineapple, cubed (1 cup): The acidity and tropical sweetness anchor this section perfectly. Cut these as close to assembly as possible—they oxidize and lose brightness quickly.
- Gold/Yellow Section — Dried apricots (1/2 cup): Their jammy richness glows against the pale cheese and bright honey. Quality matters here; buy the best you can find.
- Gold/Yellow Section — Honeycomb or honey drizzle (8 oz): This is pure luxury and pure light. If using honeycomb, it's edible and provides wonderful crunch. If drizzling honey into a shallow bowl, it creates a golden pool that guests will surround.
- Gold/Yellow Section — Smoked cheddar, cubed (6 oz): The smoke flavor adds complexity and justifies the golden color. This cheese is more forgiving than others if it warms slightly.
- Gold/Yellow Section — Marcona almonds (1/2 cup): These Spanish almonds are roasted and salted, creating a more elegant nut than regular almonds. They're worth seeking out.
- Gold/Yellow Section — Thin-sliced prosciutto (6 oz): Arrange these in gentle, loose folds—they look impossibly delicate that way. The saltiness against the sweet pineapple and honey is inspired.
- White Section — Cauliflower florets (1 cup): These become a neutral canvas and a textural anchor. Some people skip vegetables, but raw cauliflower here prevents the white section from feeling too indulgent.
- White Section — White cheddar cubes (1 cup): Sharper and paler than regular cheddar, this cheese brings sophistication. Don't confuse it with mild white American cheese.
- White Section — Yogurt-covered pretzels (1/2 cup): These add sweetness and crunch in a way that feels playful rather than fussy. They're also the most likely to disappear first.
- White Section — Whipped ricotta (8 oz): Lighter and airier than cream cheese, this dip anchors the white section beautifully. Serve it in a shallow bowl so it catches light.
- White Section — Macadamia nuts (1/2 cup): Buttery and pale, they melt on the tongue. They're expensive, but on a board this special, they feel earned.
- White Section — White chocolate bark, broken into shards (1/2 cup): This adds elegance and a touch of sweetness. Arrange pieces vertically so they stand out rather than laying flat.
- White Section — Sliced turkey breast, optional (6 oz): If using, roll these gently for texture and visual interest. Many guests will skip the meat here anyway, so it's truly optional.
- All Sections — Toasted baguette slices (1 large baguette, sliced): Toast these until just golden with a bit of char. They taste infinitely better than soft bread and provide structure to the whole board.
- All Sections — Assorted crackers (1 box): Choose neutral options and some with seeds. These fill gaps and give guests paths to explore the board.
- All Sections — Fresh herbs for garnish (1 bunch rosemary, thyme, mint): These aren't just decoration—they perfume the entire board. Break sprigs and tuck them everywhere, especially where they'll brush against guests' hands as they reach.
- All Sections — Edible flowers (pansies, nasturtiums): These are the final magic touch. A few scattered across each section elevates the entire presentation from "impressive party spread" to "edible art installation."
Tired of Takeout? 🥡
Get 10 meals you can make faster than delivery arrives. Seriously.
One email. No spam. Unsubscribe anytime.
Instructions
- Build Your Architectural Foundation:
- Before any food touches anything, assemble your pedestals and stands on your largest, sturdiest table. This is where the magic begins—place your tallest pedestal in the center or slightly toward the rear, then cascade shorter stands in front like you're designing a stage set. The height variation is what transforms a board into a theatrical display. Cover all surfaces with parchment or cheese paper; this isn't just practical for cleanup, it's essential for food safety and prevents oils from staining your nice surfaces. Stand back and visualize your color zones even with an empty stage—this mental mapping will guide everything that comes next.
- Plan Your Color Quadrants with Intention:
- Before you open a single ingredient, mentally divide your board into four distinct zones: red, green, gold/yellow, and white. If you're using multiple levels, you might have a main zone on your largest tier and supporting elements on smaller ones, or you might devote each level to a different color. This is the critical thinking moment—you're a designer now, not just a cook. Place small bowls or ramekins strategically within each zone; these will anchor your dips and spreads and become visual focal points. The bowls themselves matter; choose ones that feel intentional and beautiful enough to be part of the display.
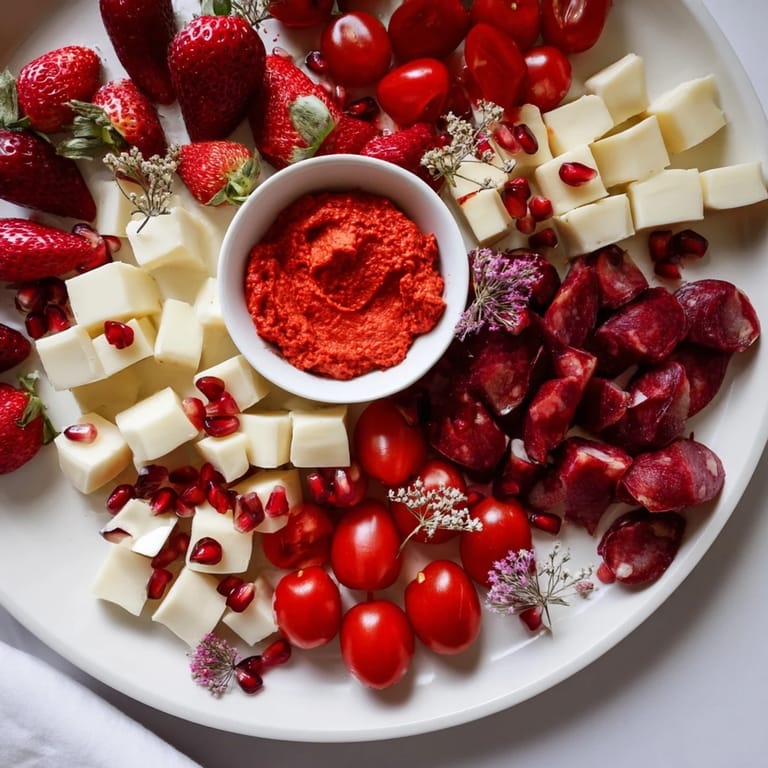
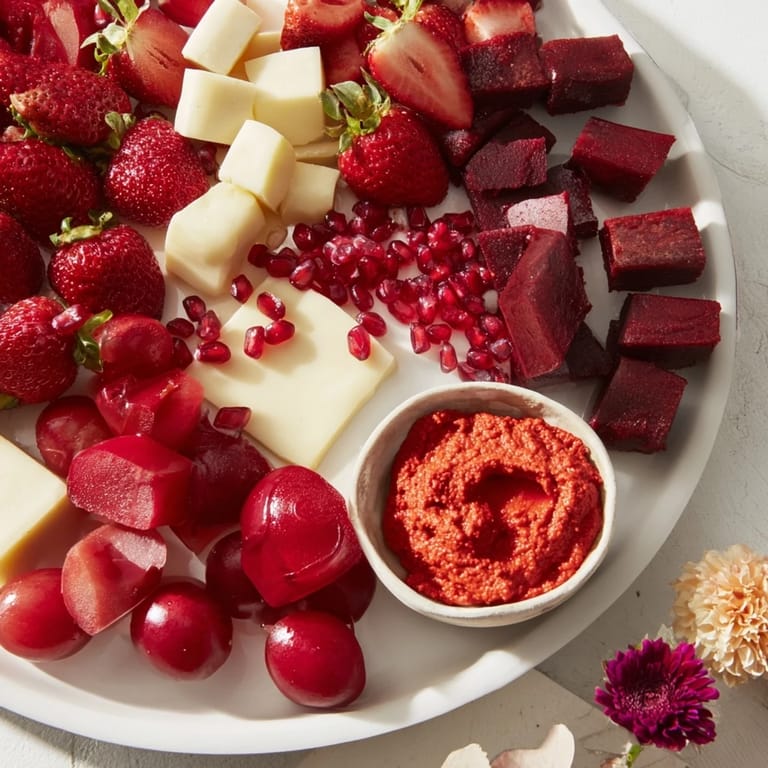
- Anchor and Arrange the Red Section:
- Begin by placing your red pepper hummus in its decorative bowl—this is your red zone's heart. Now fan out your strawberries around it, positioning them with their cut sides showing where possible so guests see the jeweled interior. Scatter cherry tomatoes around the berries, some whole and some halved for visual interest. Slide in your soppressata slices in loose, gentle folds—they should look casually elegant, not formally arranged. Tuck cubes of red Gouda between fruits and meats, creating pockets of color variation. Fill remaining gaps with pomegranate arils and dried cranberries, letting these smaller elements nestle naturally into spaces. The rule for this section is: nothing should look crowded, but nothing should look sparse either. Each element should be visible and distinct. Finish with edible flowers scattered where they catch light.
- Build the Green Section with Freshness:
- Set your pesto dip in a beautiful bowl—this is your second anchor and your visual heart. Arrange your halved green grapes in arcs radiating outward from the bowl, creating patterns that guide the eye. Place sugar snap peas as little architectural elements, their natural curves creating dimension. Arrange herbed goat cheese coins in neat rows or gentle rosettes—these small decisions create the impression of intentionality without looking overly fussy. Scatter Castelvetrano olives throughout, letting them settle into crevices. Layer in your paper-thin cucumber slices in overlapping patterns that catch light and create reflective surfaces. Sprinkle roasted pistachios to add crunch-that-catches-light throughout the section. Tuck fresh mint sprigs everywhere—mint is green's best friend aromatically and visually. Step back frequently while building this section; green should feel fresh, verdant, and like a little spring garden captured in food form.
- Create the Gold Section with Luminous Warmth:
- Set honeycomb or honey in a shallow bowl as your centerpiece—honey should glisten and glow. Arrange golden cherry tomatoes and pineapple cubes in gentle arcs around this golden center, choosing pieces that catch light beautifully. Fold your prosciutto loosely and arrange in gentle waves; this meat should look delicate and impossibly thin. Distribute smoked cheddar cubes so they're scattered but visible, adding warm orange tones. Intermingle dried apricots and Marcona almonds, choosing pieces of varied sizes to create natural texture variation. Everything in this section should feel warm, luxurious, and glowing. Tuck fresh thyme sprigs throughout—thyme adds an herbal note that balances the sweetness. The goal is to create a section that literally glows with golden warmth.
- Design the White Section with Elegance:
- Anchor with whipped ricotta in a shallow bowl—let it sit proud and beautiful. Arrange cauliflower florets in clusters, creating little white mountains and valleys. Add white cheddar cubes scattered throughout, ensuring they catch light against the pale surfaces around them. Position yogurt-covered pretzels where they'll be discovered—these little crunch bombs surprise people pleasantly. Break white chocolate bark into vertical shards and position them to stand upright rather than laying flat; this catches light dramatically differently. Nestle macadamia nuts into spaces, their pale buttery color adding to the creamy feeling. If including turkey, roll it gently into loose cylinders. Garnish generously with rosemary sprigs and white edible flowers—this section should feel crisp, clean, and elegantly monochromatic in the most sophisticated way possible.
- Integrate Accompaniments Throughout:
- Slot your toasted baguette slices and crackers strategically between sections, creating pathways that guide guests around the board. Don't cluster all the bread in one spot—distribute it so it acts as a visual and functional bridge between color zones. Take your remaining fresh herb sprigs and scatter them across the entire board, not just within their color zones. This unifies everything visually and adds aromatic depth that wraps around the whole display. Distribute your remaining edible flowers, placing them where they'll catch light and add that final theatrical flourish. This is the moment where the board transforms from impressive to magical.
- Step Back and Balance:
- Walk away from your board and view it from different angles, the way guests will experience it as they enter the room. Assess the overall balance of heights, colors, and textures. Move elements if something feels out of place. Adjust heights if one section feels too heavy or light. This is your moment to polish the presentation without tweaking individual items obsessively. The board should feel balanced, theatrical, intentional, and like someone who understood design created it.
- Present and Manage Throughout Service:
- Bring the board to the party at room temperature for best flavor and texture contrast. If you must assemble ahead, loosely cover with plastic wrap and refrigerate, but don't store this way for more than two hours—condensation will wilt herbs and soften crackers. As the party progresses, rotate which sections are most replenished, keeping the overall color-blocked visual balanced. Replace empty bowls quickly with fresh dips. Remove and discard items that look tired or have been out too long. A beautiful board deserves active management, and this becomes part of the entertaining performance itself.
 Pin
Pin The moment I'll treasure most happened when my ninety-year-old grandmother stood in front of the board and said, "I remember when food used to be arranged like this—with care and intention." She spent twenty minutes choosing from each section slowly, mindfully, treating it like a tasting menu rather than a party snack. That's when I understood: this board isn't about showing off. It's about reminding people that food is worth slowing down for, that presentation matters because it shows respect for those eating it, and that a table can be a stage for small, beautiful moments.
The Art of Color Theory on Your Board
When I first attempted this board, I thought color-blocking was purely aesthetic. Then a food stylist friend explained that color actually signals flavor expectations to our brains before we taste anything. Red says "bright and tart." Green says "fresh and herbaceous." Gold says "rich and slightly sweet." White says "clean and mild." When you honor these color-to-flavor associations, the board becomes intuitive to navigate, and guests naturally discover flavor combinations that work beautifully together. This isn't accident—it's science wrapped in art. The four-color structure also means that no single color dominates; the eye travels around the board in a complete journey rather than settling on one focal point.
Sourcing Ingredients That Sing
The honest truth about this board: most of your success depends on ingredient quality, not on your arranging skill. A mediocre strawberry arranged beautifully still tastes mediocre. So shop intentionally. Visit farmers markets for berries and fresh herbs if possible—their flavor and visual quality exceed supermarket options. Choose cheeses with visual distinction: deep red Gouda really is different from mild white cheddar visually and in taste. Seek out specialty items like Castelvetrano olives and Marcona almonds; these aren't expensive when you're buying for a board that serves twelve to sixteen, and they're what transform "nice spread" into "people will remember this." Buy the honeycomb if you can find it—it's theatrical and honestly delicious. These ingredient choices are your invisible foundation; people won't consciously notice them, but they'll taste the difference and feel the intention.
Timing, Prep, and the Stress-Free Assembly
I used to stress about assembling this board right before the party, convinced any earlier timing would result in sad, wilted components. Then I learned to prep strategically: slice all cheeses and produce the morning of, storing them in separate airtight containers. Toast your bread and prepare your nuts. Wash and dry your herbs. This way, on party day, assembly becomes a 20-30 minute snap instead of a panicked hour. The only things that truly need last-minute attention are items that brown or wilt: avocado (which I don't use for this reason), certain fruits, and fresh herbs as final garnish. By separating prep from assembly, you transform this from a stressful undertaking into something genuinely enjoyable—the kind of work that feels meditative rather than frantic.
- Prep all fruits, cheeses, and vegetables the night before or morning of, storing them separately in labeled containers so assembly day is purely about arranging.
- Toast your bread and prepare any fresh garnishes within 4 hours of service to ensure maximum freshness and crunch.
- Set up your pedestals and cover them with parchment the hour before guests arrive; this creates a clean canvas and prevents any rush or stress.
 Pin
Pin This board changed how I think about entertaining. It proved that impressive doesn't require complicated, that beauty and function can coexist peacefully, and that the most memorable meals are often the ones shared standing up, reaching for favorites across a beautiful landscape of flavor and color.
Recipe Q&A
- → How do I create the multi-tiered display?
Use pedestals and cake stands of varying heights arranged on a sturdy table. Place the tallest stand at the center or back, with shorter ones in front for a cascading effect.
- → What ingredients are included in the red section?
The red section features strawberries, cherry tomatoes, pomegranate arils, red pepper hummus, dried cranberries, spicy soppressata slices, and red wax Gouda cubes.
- → How can I keep the sections visually distinct?
Arrange each color group separately with dips in small bowls anchoring each zone. Maintain spacing and add edible flowers or herbs to highlight the divisions.
- → Can I modify the board for vegetarian preferences?
Yes, omit meat items and replace with plant-based alternatives like marinated tofu, nut cheeses, or vegetable dips to maintain texture and flavor variety.
- → What’s the best way to store leftovers?
Store components in airtight containers separately in the refrigerator and consume within two days. Keep honeycomb, nuts, and crackers separate to prevent sogginess.
- → What makes the gold/yellow section unique?
It includes golden cherry tomatoes, fresh pineapple cubes, dried apricots, honey drizzle or honeycomb, smoked cheddar, Marcona almonds, and thin-sliced prosciutto for warm color tones.