 Pin
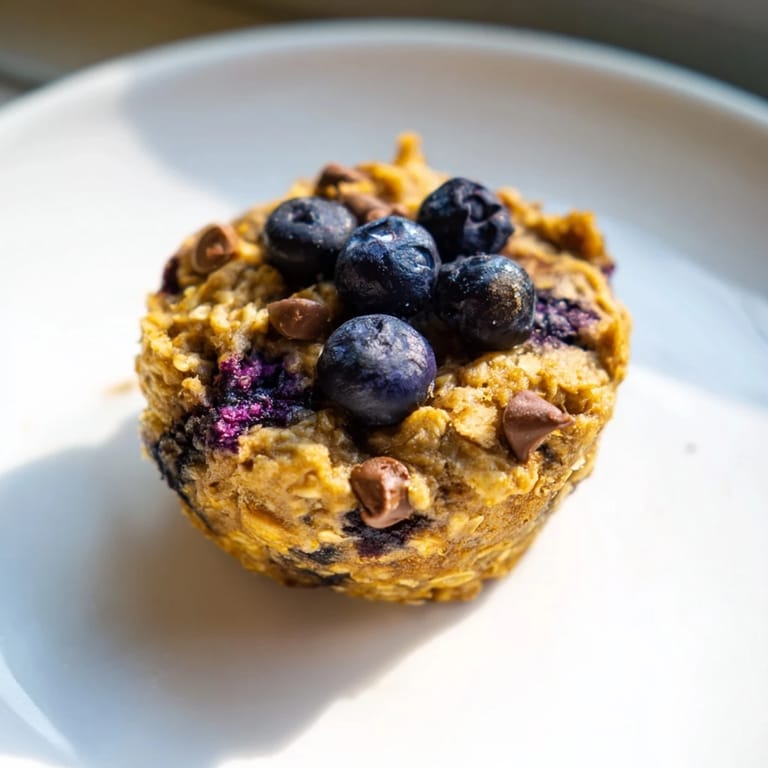
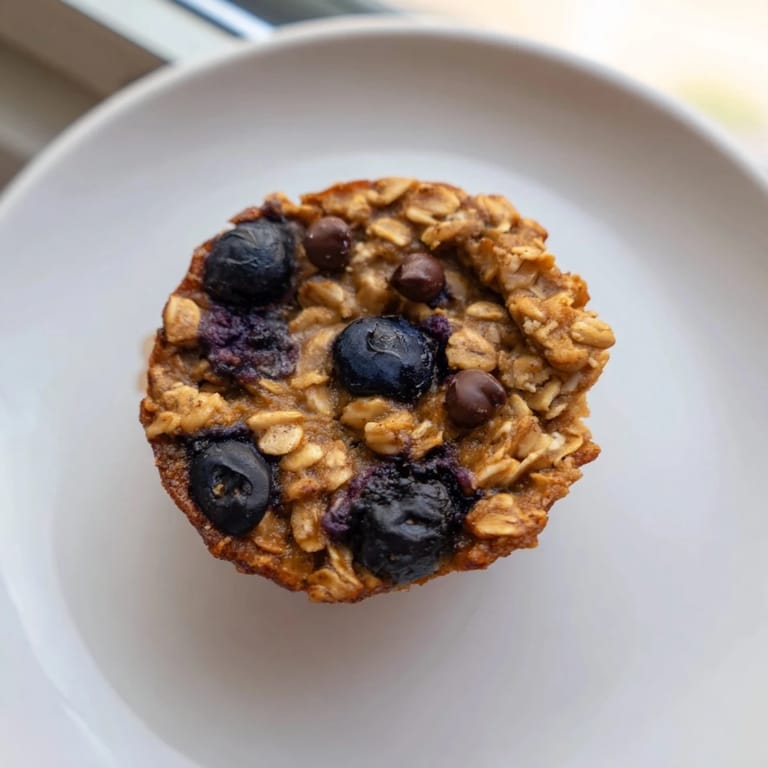
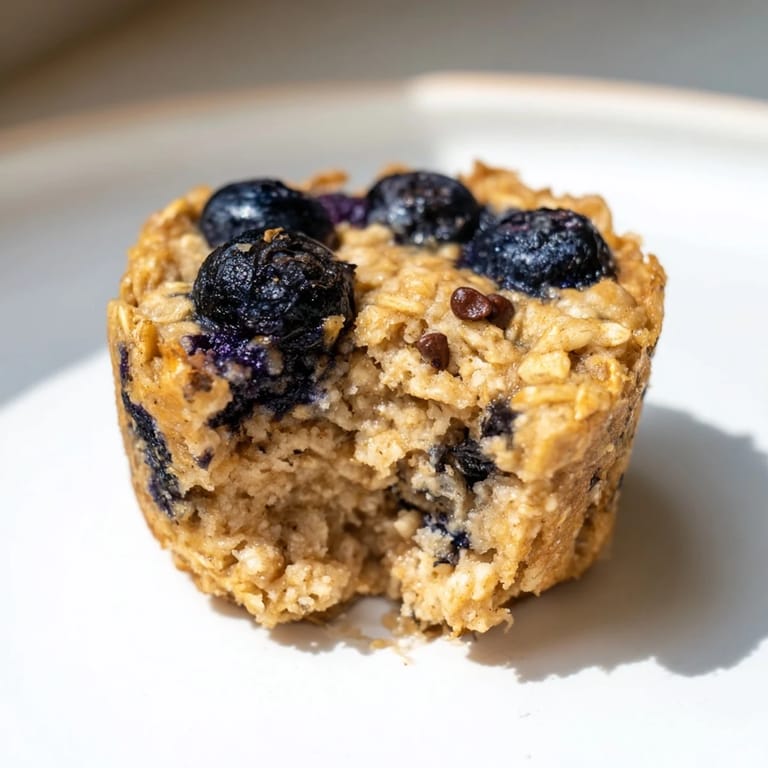
Pin I discovered these baked oatmeal cups on a chaotic Tuesday morning when I was desperately searching for something I could grab without burning my toast. A friend had sent me a TikTok link weeks earlier, and I'd finally decided to try them. The first batch came out golden and slightly chewy, and suddenly I wasn't scrambling through the week anymore—I had twelve little cups of peace waiting in my fridge. Now I make them every Sunday, and my kitchen smells like cinnamon and possibility.
Last month, I brought a batch to my neighbor who'd just had a baby, and watching her face light up when I explained she could eat them one-handed while holding her daughter made me realize these weren't just convenient—they were genuinely kind. She texted me the next day asking if I could share the recipe, which felt like the highest compliment a home baker could receive.
Ingredients
- Old-fashioned rolled oats: Use 2 cups of the thicker, heartier kind—they hold their texture instead of turning mushy, and that's the whole point here.
- Light brown sugar: 1/2 cup packed, and don't be shy with the packing—it keeps everything moist and chewy.
- Baking powder: 1 tsp is what gives these their lift, making them fluffy instead of dense.
- Ground cinnamon: 1/2 tsp, or more if you're someone who thinks cinnamon improves literally everything (no judgment).
- Salt: 1/4 tsp to balance the sweetness and wake up all the flavors.
- Eggs: 2 large ones are the binding agent that holds this whole thing together.
- Milk: 1 1/4 cups of whatever you have—dairy, almond, oat, coconut—they all work beautifully here.
- Applesauce: 1/4 cup unsweetened keeps things moist without adding more sugar, and you barely taste it.
- Melted coconut oil or butter: 1/4 cup for richness and a tender crumb—either works depending on what you're feeling.
- Vanilla extract: 1 tsp pure vanilla is worth the splurge; it makes a noticeable difference.
- Optional mix-ins: Up to 1 cup total of whatever calls to you—berries, chocolate chips, nuts, dried fruit—this is where your personality shows up in the recipe.
Tired of Takeout? 🥡
Get 10 meals you can make faster than delivery arrives. Seriously.
One email. No spam. Unsubscribe anytime.
Instructions
- Set the stage:
- Preheat your oven to 350°F and line your muffin tin with paper liners or give it a light spray of nonstick coating. This step matters more than you'd think—it's the difference between cups that pop right out and ones that stick stubbornly.
- Combine the dry team:
- In a large bowl, whisk together the oats, brown sugar, baking powder, cinnamon, and salt until everything is evenly distributed. You're looking for the dry ingredients to be completely mixed so no spoonful is more cinnamon-heavy than the next.
- Build the wet mixture:
- In another bowl, whisk the eggs, milk, applesauce, melted oil or butter, and vanilla until the mixture is smooth and completely combined. The applesauce will seem like a weird addition, but trust it—it disappears and just makes everything better.
- Marry the two:
- Pour the wet ingredients into the dry ones and stir gently until you don't see any dry streaks of oat. Don't overmix; this isn't a cake where you need to develop gluten, and overworking it makes things tough.
- Add your personality:
- Fold in your chosen mix-ins, keeping the total to about 1 cup so the cups bake evenly. I usually go for a mixture—some chocolate chips, some berries, maybe a handful of walnuts—so every cup feels a little different.
- Fill the cups:
- Divide the batter evenly among the prepared muffin cups, filling each almost to the rim. They won't rise a ton, so generous filling means generous breakfast.
- Bake until golden:
- Bake for 23 to 27 minutes, checking at the lower end of the time if your oven runs hot. They're done when the tops look set and golden and a toothpick inserted in the center comes out mostly clean with just a few moist crumbs.
- Cool with patience:
- Let them sit in the pan for 5 minutes so they firm up enough to handle, then transfer them to a wire rack to cool completely. This waiting is important—they'll be fragile while warm.
 Pin
Pin The real magic happened when my daughter asked if she could help make them, and we spent a Saturday afternoon covered in oat flour, taste-testing mix-in combinations like we were conducting important scientific research. Now these cups mean something bigger than breakfast—they're the taste of her saying, "Can we make them again?"
Storage and Make-Ahead Magic
These cups were basically invented for people like us who forget to eat breakfast or wake up five minutes before we need to leave. Keep them in an airtight container in the fridge for up to 5 days, and they actually taste better on day three, when the flavors have settled into each other. Freezing them works perfectly too—they'll keep for up to 2 months, and you can pull out just what you need without thawing. A quick 30-second microwave warm-up and you've got breakfast without the guilt or the rush.
Mix-In Ideas and Inspiration
The beauty of this recipe is that it's not precious about what you add to it. Fresh berries make them feel fancy on a Tuesday; mini chocolate chips turn them into a dessert breakfast situation; chopped pecans add a subtle richness that sneaks up on you. I've tried adding everything from diced apple to pumpkin puree to a swirl of almond butter, and the formula always works. The only rule is keeping it to about 1 cup total so the baking stays even and the texture stays true.
Customizing for Different Diets and Preferences
These cups are genuinely flexible about dietary needs, which is maybe why they became my go-to recipe for potlucks and sharing. Plant-based milk and oil swap in seamlessly if you're going dairy-free; flax eggs (2 tablespoons ground flaxseed mixed with 5 tablespoons water) work perfectly if you're vegan and you're willing to wait 15 minutes for them to gel. Certified gluten-free oats make this completely gluten-free without changing a thing about how it tastes or bakes. Experiment with spices too—a pinch of nutmeg or cardamom can shift the whole flavor profile into something unexpected.
- For vegan cups, prepare flax eggs first and let them sit while you gather other ingredients.
- Always double-check that oats are labeled certified gluten-free if that matters for your kitchen.
- Keep a note of which mix-in combinations become your favorites so you can recreate the magic.
 Pin
Pin These oatmeal cups have become my answer to the question "What should I make?" when I'm tired but don't want to sacrifice nutrition. They're the kind of recipe that pays you back every single time you make them.
Recipe Q&A
- → Can I make these oatmeal cups gluten-free?
Yes, by using certified gluten-free rolled oats, you can keep these cups gluten-free without affecting texture or flavor.
- → What are some good mix-ins to add?
Fresh or frozen berries, mini chocolate chips, chopped nuts like walnuts or pecans, and dried fruits such as raisins or cranberries work wonderfully.
- → How do I make these vegan-friendly?
Substitute eggs with flax eggs (2 tbsp ground flaxseed mixed with 5 tbsp water) and use plant-based milk and oil to keep them vegan.
- → How should I store the oatmeal cups?
Store them in an airtight container in the fridge for up to 5 days, or freeze for up to 2 months to enjoy later.
- → Can I add spices for variation?
Absolutely! Adding spices like nutmeg or cardamom can add a warm, aromatic twist to the flavor profile.